Easy Cloak Sewing Pattern - There will be a lip of paper (.5 inches) that hangs over the edge of the fabric. This captivating throw quilt pattern is perfect for keeping for yourself or sharing with a friend. A line cape pattern the back pattern is one piece but the front pattern is in two parts.for the back pattern you need 40″ wide and 20 inch long piece. This long hooded cloak pattern is easy to make and is free! Wool or wool like fabric {blue version} sherpa fabric {red version} flannel would work too. Web these easy sewing instructions walk you through the steps of making your own cloak (or cape) from a 1 metre length of fabric. Pin the lining to the interior of the hood, right sides together, lining up the notches. A half inch of collar should overlap on either side. With right sides together, sew the right side of the front to the back of the cape, using a.5 inch seam allowance. Place a few pins to hold the fabric in place, and then sew over the pinned area.

17 DIY Hooded Cloak Sewing Patterns (FREE Pattern)
Web sew the hood of the cloak: Web the simple cape sewing pattern makes it fine for anyone who is at a loss for a.

24+ Marvelous Photo of Cloak Sewing Pattern
Print and assemble your hood as shown here. Place a few pins to hold the fabric in place, and then sew over the pinned area..

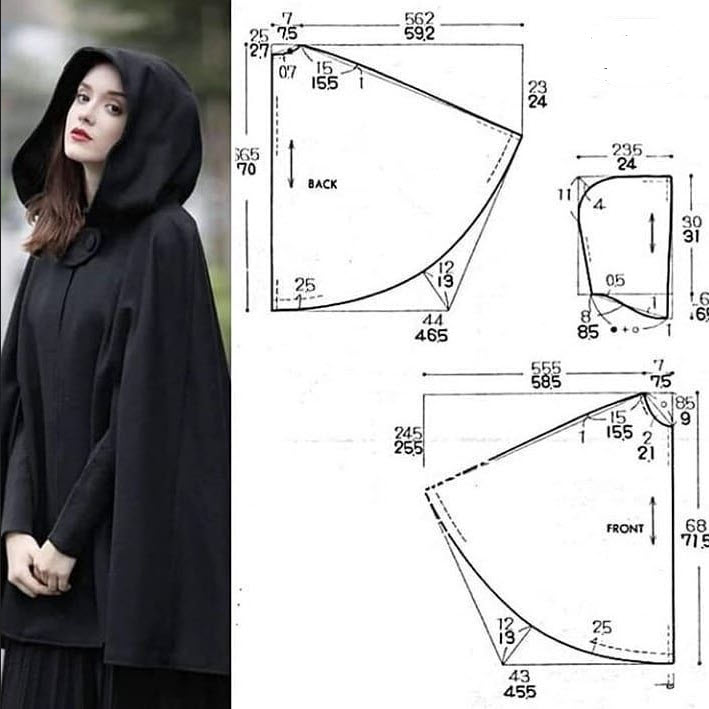
How to make a circle cape free cape pattern Gathered
Sew together along the interior neckline using a.5 inch seam allowance. The hood takes about 1 yard of fabric and the cape takes almost 2..
19+ Free Cloak Sewing Pattern
You’re attending a costume party, a renaissance fair, or even a cosplay event, and you want. The hood takes about 1 yard of fabric and.

Free Cloak Sewing Pattern There Are Lots Of Chevron Quilt Variations
Hem the bottom of the cloak with a 1/4 inch double fold hem. You’re attending a costume party, a renaissance fair, or even a cosplay.

Easy Cloak · How To Make A Cape / Cloak · Sewing on Cut Out + Keep
1.4 of an inch is all you need to be from the edge. Print and assemble your hood as shown here. Take the cape and.

I love this easy to sew diy cape tutorial. It's beginner friendly and
Cut two identical large squares or rectangles from each fabric. Web the simple cape sewing pattern makes it fine for anyone who is at a.

24+ Designs Cape Jacket Sewing Pattern Bydeviangatirah
Add one to start the conversation. [12] this will secure the opening and finish the edges of your cloak. We think this one is great.

31 Cloak Sewing Pattern Simplicity ravaaeni
Web first, set your sewing machine to the longest stitch length possible (mine is at 6.0). To make this diy cloak, you will be cutting.

Sewing Patterns Free, Free Sewing, Clothing Patterns, Easy Sewing
With right sides together, sew the right side of the front to the back of the cape, using a.5 inch seam allowance. Now sew the.
Perfect For Making Your Own Dev.
You may need to go slow as you are sewing through thick layers. Perfect sewing project and beginner friendly. Web these easy sewing instructions walk you through the steps of making your own cloak (or cape) from a 1 metre length of fabric. Sew around the edges, leaving a gap for turning.
Sew Together Using A.5 Inch Seam Allowance.
With right sides together pin along the short side of the cape (the selvedge edges). Place a few pins to hold the fabric in place, and then sew over the pinned area. For the hood portion of your cloak, you’ll want no more than 1 yard of fabric for the kid sizing or the adult sizing. After hemming baste and gather the fabric at the top of the material.
Here Are My Favorite Free Sewing Patterns For Summer Fun And Play.
Sew a ribbon around the neck to tie the cloak on or add a button and elastic loop closure. There will be a lip of paper (.5 inches) that hangs over the edge of the fabric. Add one edge of your collar along the neckline of your cape, faces together. You’re attending a costume party, a renaissance fair, or even a cosplay event, and you want.
Take The Cape And Sew A Basting Stitch Along The Top ( The Straight Edge).
Need two yards of fabric of 60″ wide. With right sides together, sew the right side of the front to the back of the cape, using a.5 inch seam allowance. Video tutorial makes it easy to sew, simple seams and great for a variety of costumes. Print and assemble your hood as shown here.